Connector-Native Apps: A Remote MCP Server Whose Customer Is an AI
14 Concepts · ~90–120 min to read · a focused day to build (4–6 hr if you're a strong dev) · from a minimal base to a live connector any AI can pick up and use, free
For thirty years we built software for people. Screens to look at, buttons to press, forms to fill in. The customer on the other side of the glass was always a human being.
That is no longer the only customer in the room. In this course you build a product whose user is an AI.
A connector is the add-on a person drops into their AI so it can reach an outside app; they paste yours in once, one URL, one click. That is the last time a human touches it directly. From then on the AI is your user: it reads the names of your tools, decides on its own which to call, hands you the inputs, and speaks your results back to the person. You are not dressing a shop window for a shopper to browse. You are hanging a pegboard of labeled tools that a tireless worker walks up to and uses by itself, turn after turn, on its own initiative. Today a human is usually sitting in that chat. Increasingly, the thing that finds your connector, signs in, and calls it on a schedule will be another agent, with no human turn in between. You are building for that customer.
First, the word that runs through this whole course: a server. A server is a computer that stays on all the time at a fixed address, waiting for other computers to ask it for something and answering when they do. Every app on your phone is talking to one. Picture a shop's front counter: always open at a fixed spot, doing nothing on its own, but the moment a customer steps up it does one job and hands back the result. That is your server. An MCP server is one particular kind of server: one that follows MCP, a shared standard (think a USB port for AI, one plug every assistant fits) so any AI can use what it offers with no custom wiring.
You will build one real product, end to end:
- A remote MCP server: that front counter, placed at a public web address (this is what "remote" means) so any AI on the internet can reach it. Yours holds three groups of tools.
- A two-table memory (two small lists your app keeps), so the AI remembers a person from one conversation to the next instead of starting blank every time.
- A real sign-in (OAuth), so your server learns whose data it is holding from the login itself, without ever asking the AI to vouch for it.
- A session contract: one tool the AI calls first that hands it your app's rules, then locks every other tool behind a key only that first call issues.
- The whole thing added with one pasted URL and one click, running on the person's own free model, so it costs you nothing to serve.
You ship all of this before you write a single agent loop. That is the point of putting it first: you learn to build the thing an agent calls before you build the agent itself.
One rule explains every hard part that follows, and it comes straight from who your customer is: you own the server, not the mind that calls it. The intelligence lives in the AI's host app. The loop that decides what to do next lives there too. Your server only ever answers when it is called, and the caller is a mind that reasons by guessing: fast, capable, and entirely able to be confused, talked into something, or simply wrong. So every difficult part of this course has the same shape. It is your server doing a job the AI cannot be trusted to do for itself.
That leaves four non-negotiables. The whole course is these four, built:
- One gateway. The AI meets you at a single connector, with tools grouped by name behind it: one front door, one menu it reads. (A free account can add only one custom connector, so "one" is a hard limit, not a preference.)
- Tools only. You speak to the AI through callable tools, functions it can invoke in the middle of its own reasoning, never through resources or prompts a human would have to pick by hand.
- Prove, don't trust. Your customer is a mind that could hand you the wrong person's identity without meaning any harm. So identity comes from a verified sign-in, never from anything the AI tells you, the way a hotel desk hands over your mail on the passport you showed at check-in, not on someone's word about which room is theirs.
- Fail closed. When your server is missing or broken, the AI does not go quiet. It improvises, inventing an answer and making up the person's saved data. Your server has to make it stop and say so instead, the way an ATM that can't reach the bank shows temporarily unavailable rather than guessing your balance and handing out cash.
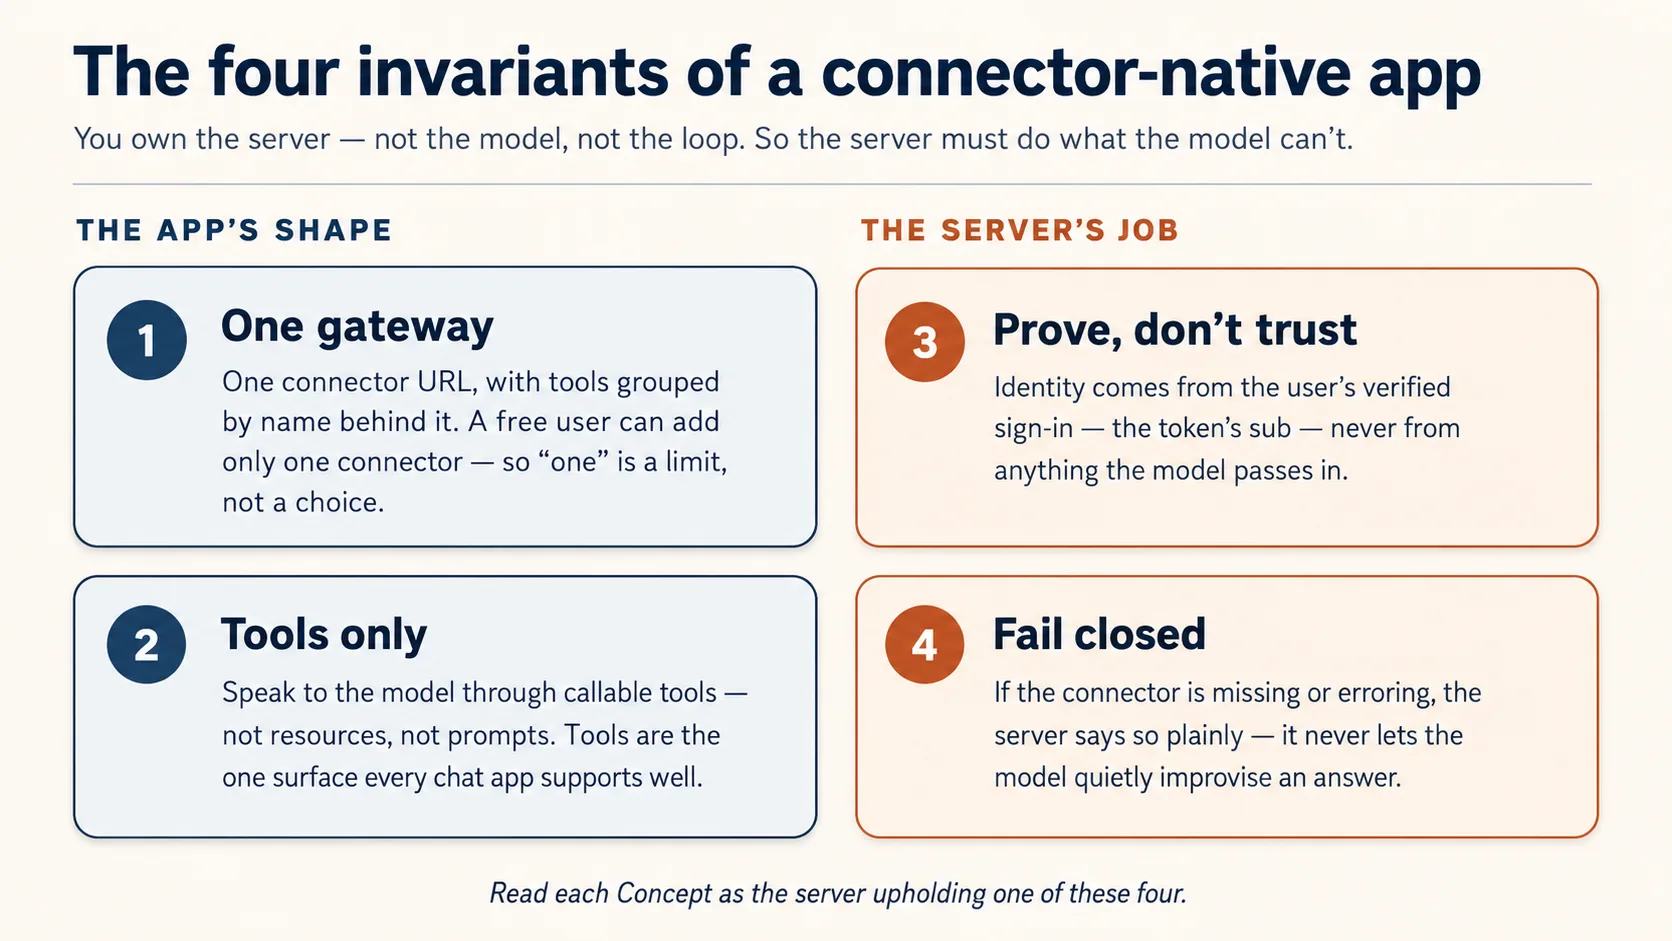
Two of these describe the shape of what you build (one gateway, tools only). The other two are jobs the server must do because the AI can't be trusted to (prove identity, fail closed). Read each Concept asking: which invariant is this?
Prerequisites. This page assumes four things.
- You can read typed Python, directly or by pasting a code block to your coding agent for a plain-English read-back. If neither is true yet, do Python in the AI Era first.
- You've done the Agentic Coding Crash Course. You drive Claude Code or OpenCode in plan mode with a rules file. We build through that workbench here instead of re-explaining it.
- You've used a connector from the outside, the Skills & Connectors course. You flipped one on and watched your AI reach into your Drive. This course flips you to the inside: now you are the thing the AI reaches.
- You do NOT need Build AI Agents first. What you build here is the server an agent calls, not the agent. That course comes later on the path, and this one is the reason you'll want it.
You don't need an API key of your own: the person brings the model. The accounts you do need are all free-tier and open only at the point of need: a Neon database when you first store state (Concept 5, no card). Concept 12 then runs your connector live in claude.ai over a free tunnel, with no host, card, or sign-in account. The sign-in half runs on a bundled local mock the whole way, so you never create a sign-in account just to build, test, or demo.
Where this sits. First build course in Mode 2. From here the Manufacturing path runs: this course → Plugins for AI Agents → AI Identity → Build AI Agents. This one is the pre-loop app: tools, state, identity, and a live run in claude.ai, with the caller's model doing the thinking. Build AI Agents, later on the path, is where you own the loop.
📚 Teaching Aid
View Full Presentation — Connector-Native Apps
How you build in this course
You don't hand-write this server. Like every Manufacturing-track course, your coding agent writes the code; your job is the spec going in and the verification coming out. You plan, you review, you run, you check. That loop is not a convenience here. It is Concept 1.
The build follows the coding course's one move at full size: plan → review → execute in checkpoints → verify. You plan the whole gateway once, review it against the four invariants, then build it one observable slice at a time, on top of a small base that ships only the parts you must read rather than generate.
Get the base ready (a few minutes)
- Download the base (
connector-native-apps-base.zip), unzip it, andcdinto the folder. - Open Claude Code or OpenCode in that folder. It auto-loads
AGENTS.md: the brief that holds your agent to the four invariants and tells it how to prep.
What's in the box. This is a minimal base, not a finished app. Only the security-critical core ships complete, because an agent will happily write authorization code that looks right and is quietly wrong, so you read that part rather than generate it. You build everything else through the course.
connector-native-apps/
  AGENTS.md                  the agent's brief: base prep, the four invariants, the build order
  CLAUDE.md                  one line, @AGENTS.md, so Claude Code loads that same brief
  .mcp.json  opencode.json   Neon + Context7 MCP servers, pre-declared (authorize once in browser)
  pyproject.toml             a uv project; only the deps the given code needs (your agent adds the rest)
  .env.example               copy to .env; the user brings the model, so no API key of your own
  src/connector_app/
    auth.py                  GIVEN, complete: the security check that proves who is signed in (you read it in Concept 7, never rewrite it)
    session.py               GIVEN, complete: the lock the rest of your tools sit behind (you wire it in Concept 10)
  mock_auth/server.py        GIVEN: a local sign-in service, so you can test the whole flow without creating any account
  seed/articles.json         a tiny catalog for your domain
  tests/test_starter.py      five offline smoke tests over the security core
The two files marked GIVEN (auth.py, session.py) you read and wire, never rewrite. Everything else, the gateway (server.py), the two-table store (db.py), and your rules and persona (config_store.py), your agent builds with you, concept by concept.
Prep the base in three short asks, the way you'd onboard with a new teammate: find out what it knows, have it set you up, then have it explain the project and prove it's healthy. Paste them one at a time.
1. See what it knows (this also checks it read its brief on open):
What can you do for me?
A good answer describes this project: a connector-native app, its four invariants, and how it will help you build it concept by concept. A generic "I'm a coding assistant" answer means it did not load AGENTS.md; make sure you opened the agent inside the base folder.
2. Set up the environment:
Set up my base environment for this project, and install anything that's missing, including Python and uv.
Watch for: the agent confirms you're on Python 3.14+ and uv (installing either if it's missing), installs the dependencies and the mcp-builder and neon-postgres skills, and creates .env with a generated SESSION_SIGNING_SECRET. Context7 is keyless and connects on its own; for Neon it runs /mcp and asks you for one browser Authorize click (free at neon.com, no API key, no card; create the account right at that screen if you need one). Then it asks you to restart it so the newly installed skills load, and confirms it can see the Neon tools when it's back.
3. Understand it, and check it's healthy (after the restart):
Explain this project to me before I continue the crash course, then run its tests and share their status.
Done when: the agent has walked you through the base in plain language, the five security-core tests pass, the Neon tools are visible after the restart, and .env exists. (No Neon tools means Neon isn't authorized yet: re-run the browser authorize, or type /mcp and pick Neon.) Now you build.
Two tracks, your choice. The Beginner track uses the bundled mock_auth/ service: a local sign-in that issues real tokens, so the sign-in half needs no account at all (your saved data still lives in a free Neon database). The Standard track swaps in a real, hosted sign-in service, the production path you wire up in the AI Identity course. Build the whole thing on the Beginner track first, then switch by changing three values in .env. You don't pick a service now; Concept 8 names the options when the choice actually matters.
Part 1: The shape
These four concepts are the mental model the rest of the page builds on. The first three are read-only; in Concept 4 you plan the whole build and scaffold the gateway.
Concept 1: You direct it, you don't type it
You will not hand-write this server. You tell a coding agent what you want, it writes the code, and your job is to read it, run it, and check it. If you came through Python in the AI Era, you already know the rhythm: you direct, the agent types, you verify.
The checking is the real skill, and one spot needs it most: the sign-in code in Concept 8. An agent will happily write sign-in code that looks right and is quietly wrong, and learning to tell the difference is exactly what this course builds in you. The keystrokes are the agent's job; the judgment is yours.
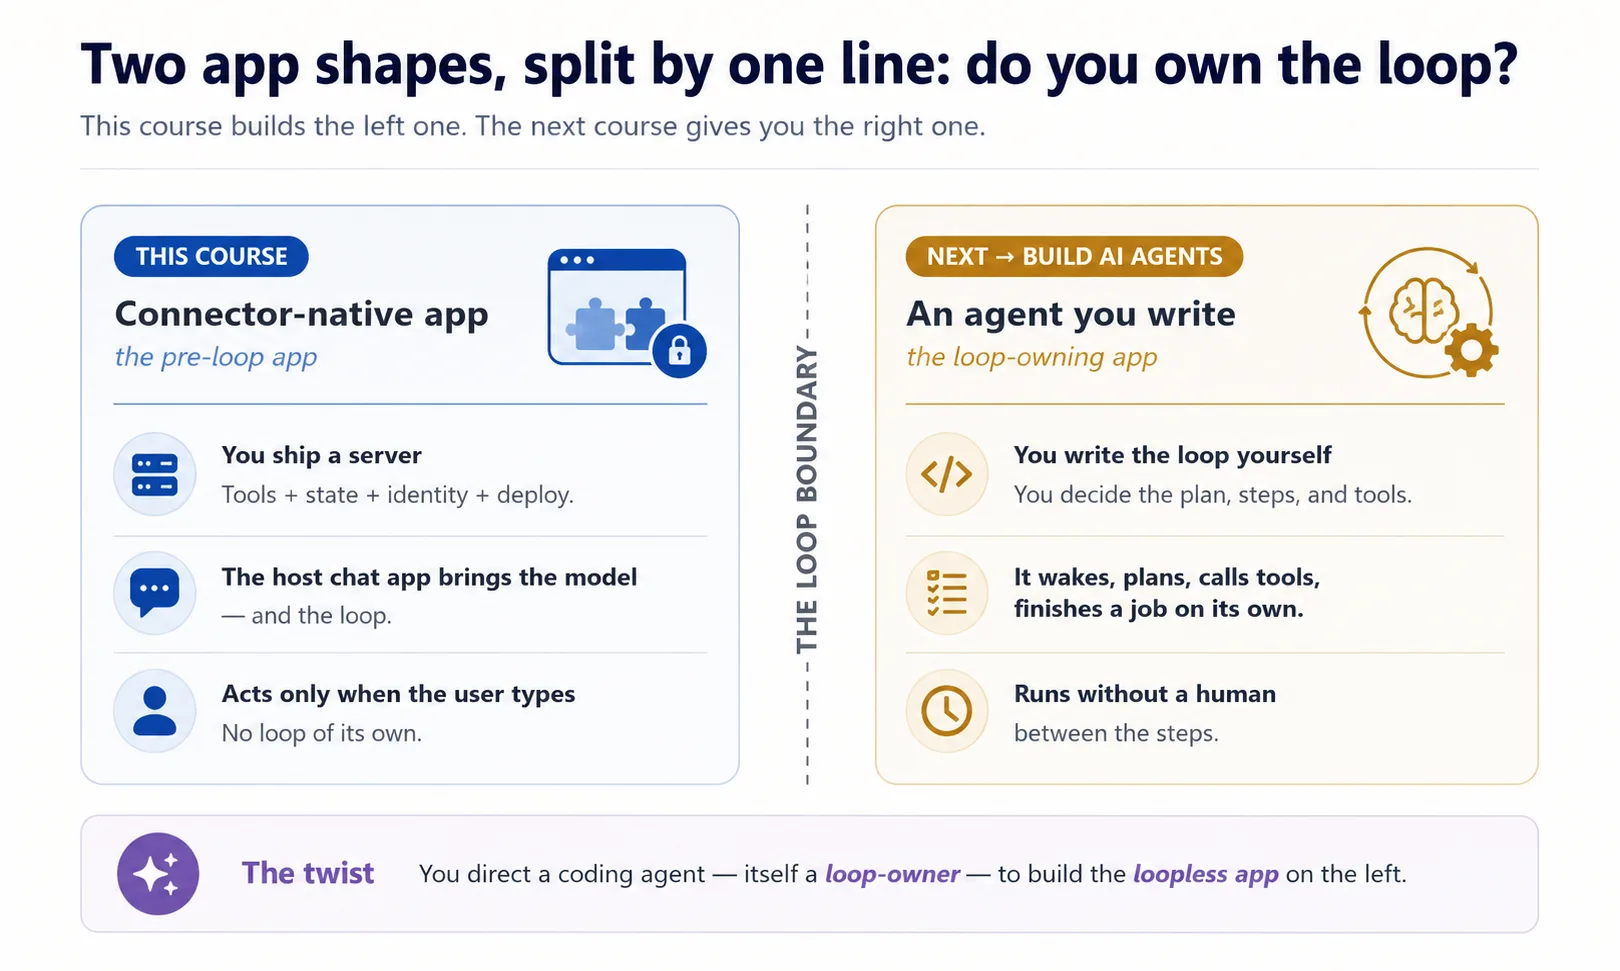
Here is the one twist worth holding onto, because this is the only course where you meet both kinds of program at once. Picture two vacuums. A robot vacuum runs itself: it wakes on its own, roams the house, decides each move, and you can even set it to clean at 2am. A hand vacuum only runs while you squeeze the trigger; let go and it stops. The coding agent that builds this for you is the robot vacuum: it keeps going on its own. The connector you build is the hand vacuum: it sits dead until the user reaches for it. That self-running quality has a name this course comes back to again and again, owning the loop: the robot vacuum owns its loop, your connector never does. You are driving a program that owns its loop to build one that doesn't.
Concept 2: The new app shape
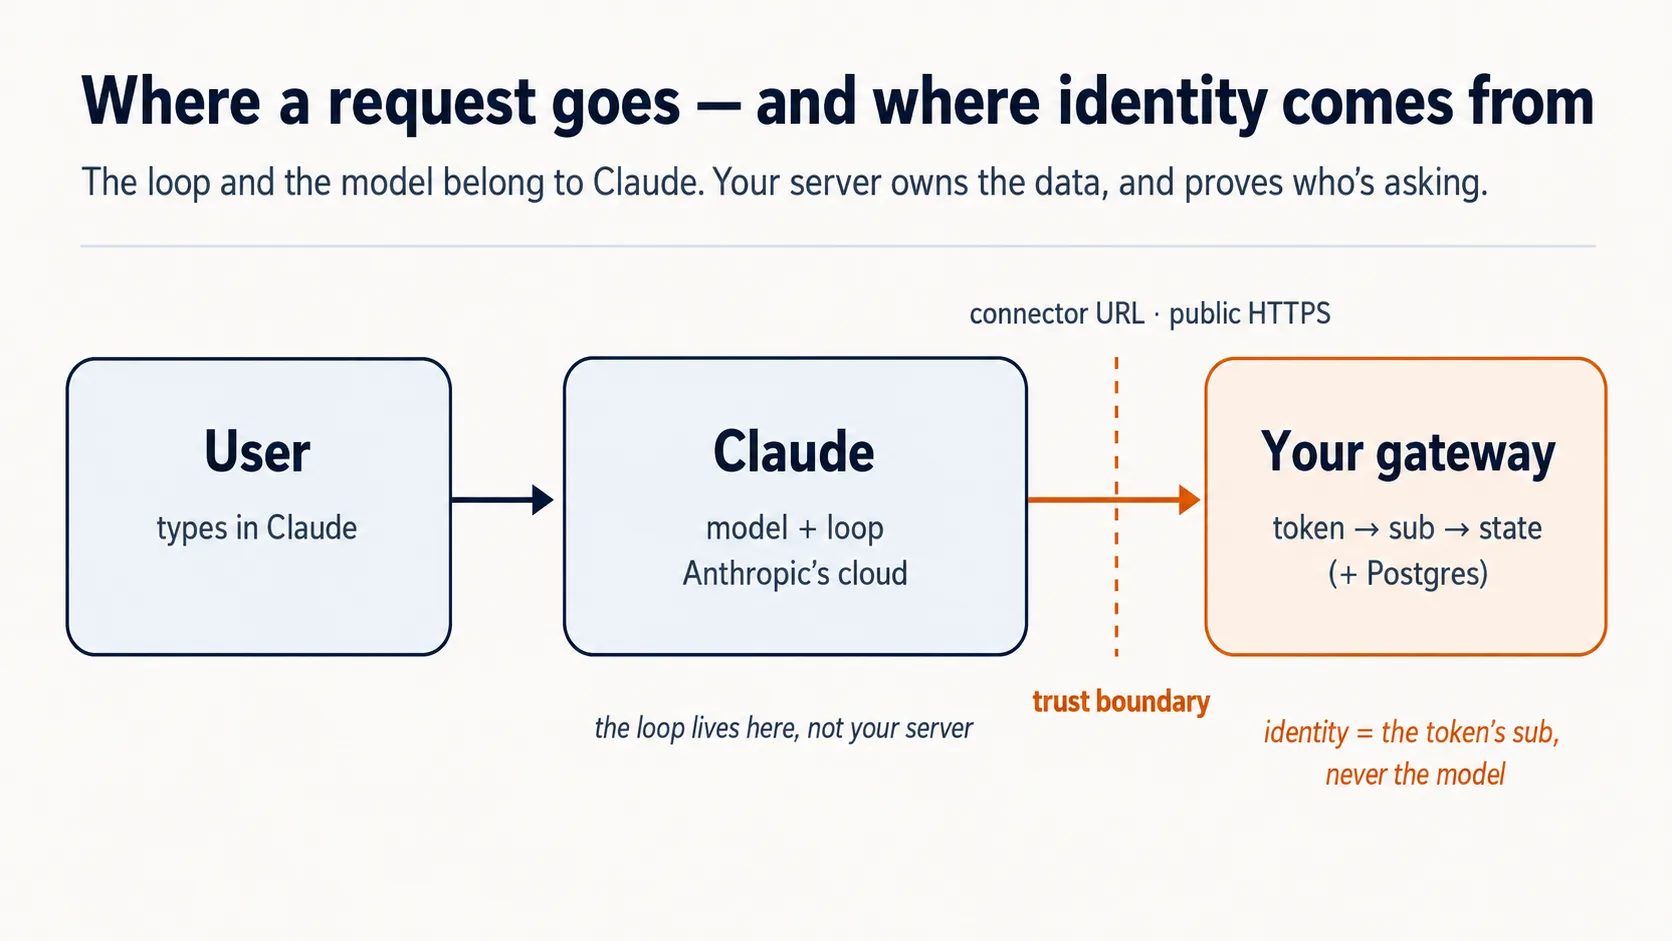
You've used a connector from the outside, as a person reaching into your own apps. Now flip it: you are the server, and your caller is the AI. Claude dials into you from its cloud. Three facts follow, and they drive every later decision.
The chat app is the runtime (the engine that actually runs everything), and it lives in the cloud. When a user adds your connector, Claude reaches your server from Anthropic's cloud, not the user's laptop. So your server must be on the public internet over HTTPS (the secure web protocol). Claude reaches you from far away, so your counter has to sit on a public street with a real address: a public web address. A server running on your laptop is that same counter built inside a locked house, perfectly real but with no door to the street, so nobody outside can walk up to it, which is why Part 5 puts it on the public internet over a quick tunnel, not as an afterthought.
The user brings the model. You don't pay for the intelligence; the user's free Claude tier supplies it. Your only costs are a small server and a database. That's the whole economic trick behind "free for anyone."
Those two facts — a cloud runtime you must be reachable from, and someone else's model doing the thinking — are why the rest of the course is about what your server must guarantee. The first of those guarantees is the narrowest: there's only one way your server is allowed to speak to that borrowed model at all. That's the next Concept.
Concept 3: Tools only — not resources, not prompts
An MCP server can offer a model three things: tools (functions the model calls, with inputs and outputs), resources (read-only data the user points at), and prompts (canned templates the user picks). All three are valid MCP surfaces. For this course's product shape, we intentionally expose only tools — that's a design choice for this kind of app, not a rule that resources and prompts are wrong in general.
Why tools fit this shape: your app has to decide on its own what to fetch or do next — search, pull a record, save a result. Picture a workshop. A tool is the cordless drill on the worker's belt: grabbed mid-job, no asking. A resource is a manual locked in a cabinet, useless until someone walks over and hands it across. A prompt is a form the worker must stop and pick off a shelf. Only the drill keeps work flowing with no human in the loop, which is exactly why this app is tools-only: only a tool can be called automatically inside the model's reasoning, while resources are passive (the user has to point at them) and prompts have to be picked by hand. Tools are also the one surface every chat app supports well, so building on tools keeps you portable.
| MCP surface | Who triggers it | Can it be auto-called mid-reasoning? | Use it here? |
|---|---|---|---|
| Tool | The model, on its own | Yes | Yes — everything |
| Resource | The user points at it | No | No |
| Prompt | The user picks it | No | No |
Concept 4: One gateway, three groups behind it (plan it, then scaffold it)
This Concept sets the shape of everything you build, so it is worth slowing down for. Start with the mess it exists to prevent.
Your server (the front counter from the opening) is about to do several genuinely different jobs at once. It looks things up. It remembers who each person is and what they saved. It follows your rules about how to behave. Throw all of that into one undifferentiated pile of tools and two things break: the AI reading your menu cannot tell a "fetch an article" tool from a "save this person's place" tool, and you cannot reason about any one part without tripping over the others. The fix is the oldest one in software: give each kind of job its own labeled group.
A connector-native app always has the same three kinds of job, and you can watch all three fall out of the Reading Room you are about to build:
domain_*is what the app actually does. For the Reading Room, that's the books: search the collection, fetch an article. It is the reason the app exists. (Point the app at your own subject later and this is the part that changes: orders for a shop, tickets for support.)user_*is who is here, and what you remember about them. The reader's library card, and the shelf they saved last visit. This is what stops the app being a goldfish that forgets you the moment you leave.config_*is how the app should behave. The librarian's rules and voice: what she will and won't do, how she speaks. (A teaching persona is one kind of config; a support bot's tone-and-escalation policy is another. Most apps need some rules; few need a full character.)
So domain is the work, user is the person, config is the behavior: three different questions, three groups. The _ prefix in each name (domain_search, user_save_state) is that grouping made visible, so the AI's menu reads in clean sections instead of one long list. (Tool names may use only letters, digits, _, and -, never a dot, so the underscore prefix is the namespace.)
Why one server, then, and not three? The textbook way to ship three separate concerns is three separate servers. You can't here (invariant 1): on the Claude Free plan a user may add exactly one custom connector. Ask a beginner to add three and you have quietly pushed your free product onto a paid plan. So you keep all three groups inside one server, behind one URL: a single gateway. One front door, one menu with three sections, the way a diner keeps breakfast, lunch, and dinner on a single card instead of handing you three. The names below are yours; this is only the shape:
domain_search      domain_get_item      domain_do_action
user_get_profile   user_save_state
config_get_rules   config_get_persona
One word you'll see in the prompts ahead: in the MCP Python framework, FastMCP, a tool is just a decorated function. A function is one labeled action that does one job; decorating it pins a name tag on it so the AI's menu can list it. Your agent writes these; you only need to recognize the word.
Prompt 1: have the agent plan the whole thing, before a line of code. This is the move that matters most in the entire course, and it is not writing code. You have the agent lay out the complete design first, in words, so you can check it against the four invariants before anything is built. Catching "identity comes from a tool argument" in a plan costs one sentence; catching it after the code exists costs an afternoon.
Enter plan mode (Shift+Tab in Claude Code, Tab in OpenCode) so the agent proposes instead of building, switch to a strong model so the plan is sharp, and paste:
I want to build the Reading Room connector on this base. Read AGENTS.md and use the mcp-builder skill for tool naming and schemas, then propose the architecture for me: the one gateway, the three tool groups (domain, user, config), how it remembers a person, and how it proves who is signed in. Show me the complete plan and the tool list before you write any code, and for each piece tell me which of the four invariants it serves and flag anything you are unsure about or that the base has not already decided.
What that prompt is doing: it hands the agent the brief (AGENTS.md) and the naming skill, then asks it to propose the architecture and the full tool list and to justify each piece by invariant, with nothing written yet. You are not dictating the design; you are asking for one you can review.
Then read the plan like an inspector (this review is the skill the course teaches). Check it against the four invariants:
- One gateway, not three?
- Tools only, with no resources or prompts carrying the app's logic?
- Identity from the verified sign-in, never from a tool argument?
- A fail-closed rule sitting in the config?
If anything is off, say so and have it re-plan. Only once the plan holds do you let it build.
Prompt 2: scaffold the empty frame, and prove it stands. Scaffolding is putting up the bare skeleton before any real walls: one server that runs, holding just enough to show the structure is sound. You start almost empty on purpose, one health-check tool and one placeholder, so that if the wiring is wrong you find out now, against two trivial tools, instead of later buried under real logic.
Switch back to a cheaper model for this routine step; the thinking already happened in the plan. One phrase in the prompt is load-bearing: stateless streamable HTTP. Streamable HTTP is the wire format a remote host like Claude reaches your server over; stateless means your server keeps no memory of any single connection, so any of Anthropic's servers can handle any call. It is the production shape, and your agent sets it once, here. Paste:
Looks right. With the mcp-builder skill's guidance, scaffold the gateway: one FastMCP server on stateless streamable HTTP transport, with a health tool and a
domain_get_itemstub. Add whatever dependencies you need. Run it and show me a local client listing both tools, with no auth and no real data yet.
What you'll see — and what to verify
A running server, and a client (a small test program that connects to your server and asks what tools it offers) listing two tools. The domain_get_item tool is still a stub, a placeholder that returns nothing real yet, and that's correct: no auth and no real data at this step. You've proven the one fact this Concept is about: a single server, tools grouped by name, on the transport a remote host can reach, that a client can discover. Identity and gating come later; don't add them yet. (If port 8000 is already in use on your machine, your agent will bind another port and keep RESOURCE_URL consistent with it; that's expected, not an error.)
✓ Checkpoint: the shape is in place. You planned the whole connector, reviewed it against the invariants, and stood up one gateway on the right transport. Every later Concept adds a real piece to this server.
Part 2: State and domain
Concept 5: State — just enough to remember a person
A generic chatbot forgets you when you close the tab. Your app must not — remembering a user across sessions is most of what makes it a product instead of a toy.
Keep v1 small: a Postgres database (a standard, free-to-start relational database) with two tables. Think of the front desk's two registers, tied together by your loyalty number: a guest register of who each person is, and a stay-log of what they're up to lately. Who-you-are barely changes; what-you're-doing changes every visit, so they live apart.
Here are those two tables written in SQL (the standard language for creating and reading a database). You don't need to read SQL to follow this: skim the plain-English comment on each line, that is the whole reason it's shown. Your agent writes this; you only review it.
-- users: one row per person
create table users (
  id    text primary key,     -- one person's verified sign-in id, the 'sub' (Concepts 7-8)
  email text
);

-- user_state: one row per person, whatever you carry between sessions
create table user_state (
  user_id text references users(id),
  state   jsonb               -- a last position, a few saved values
);
The id that links the two tables, your "loyalty number" from the front-desk picture, is in the real app the person's verified sign-in id. Its name in the code is sub (short for subject, the one piece of identity you can trust). You don't have real sign-ins yet, so Concepts 7 and 8 are where that id actually comes from; for now, just know the two tables are tied together by it.
That's the whole of v1's memory: store a row, read a row. (jsonb is one flexible column that holds a small bundle of saved values as structured data, with no fixed set of columns to declare up front.) The serious version — an audit trail of every interaction, an approval model, a record you can trust and report on — is its own discipline, and it's exactly what Building a Digital FTE teaches. Don't build it here.
You don't set up or operate this database by hand. As in every Manufacturing course, your coding agent drives Neon (a hosted Postgres you never run or maintain yourself) through Neon's own MCP server: it creates the project, makes a branch, and runs the SQL while you review. You build it in two short steps, but one thing has to be true first.
Check Neon is awake (10 seconds). Everything below depends on the agent actually reaching Neon, which you connected during setup. Ask it: "Can you see the Neon tools right now?" If yes, carry on. If no, Neon was never authorized: type /mcp, pick Neon, and click Authorize in the browser that opens (free, no card), then ask again. Don't paste the next prompt until the agent confirms it sees Neon, or it will simply fail with nothing to act on.
Prompt 1: have the agent create the store. Paste:
Using the Neon MCP server, create the two-table store (
users,user_state) on adevbranch, and save the branch'sDATABASE_URLto.env(never print it).
What that does: the agent uses Neon's MCP to spin up a project and a dev branch (a private sandbox copy of the database, so anything you do while learning stays away from real data), creates the two tables you just read, and writes the database's address into your .env file as DATABASE_URL so your code can find it. You review; it runs the SQL.
Done when: ask the agent to list the two tables it just created and to confirm .env now has a DATABASE_URL line. If it shows you users and user_state, the store exists. You never open a database tool or read SQL yourself; the agent shows you.
Prompt 2: have the agent write the read/save code. One thing to know first, so this doesn't trip you: you have no real sign-in yet (that arrives in Concepts 7 and 8), so for this test the agent uses a stand-in id wherever the real sub will eventually go. The code is still written to key on sub; you're just feeding it a placeholder until the verified one shows up. Paste:
Write
db.py: read and save a user's state, keyed by the verifiedsub(never an id from a tool argument). Show me a value saving and reading back on a fresh connection. Then explain in one line why you keyed it on the verifiedsuband refused a tool-supplied id; we will see the full reason in the next part.
What that does: the agent writes two small functions, save and read, that store a person's saved values under their sub. Then it proves the data really persisted by opening a fresh connection (a brand-new link to the database, so you know the value is saved in Neon and not just held in memory) and reading the same value back.
Done when: a value round-trips. You save something, and on that fresh connection you read the exact same thing back, keyed by the stand-in id. That is real memory: the value outlives the connection that wrote it. State works before identity does.
Concept 6: Domain — by reference now, by meaning later
Your domain is simply the stuff your app is actually about: its articles, items, records, not a web address. When the user wants a specific thing, v1 fetches it the simple way: each record has an id, and domain_get_item(id) returns it. The model works from what comes back.
What v1 deliberately does not do yet is semantic search — answering "the part about refunds" by meaning rather than by exact id. The difference is a library: fetching by id is asking for a book by its exact call number (one wrong digit and you get nothing), while semantic search is telling the librarian "I want the book about the sad whale" and having her find it. v1 is the call-number desk; the librarian is the upgrade, and it's the whole subject of the RAG course (Give Your AI Searchable Context). Wiring it in now would bloat your first ship. Build the reference version now:
Make
domain_get_item(id)return a real article fromseed/articles.jsoninstead of the stub. Show me it returninga1by id.
Done when: an article comes back by id. Fetch by reference now; upgrade to search later.
Optional: watch a real agent call your tool
So far you've only proven the server with a small listing script. Do this once, though, to feel what your connector is actually for: an agent reaching in and calling your tool on its own. The fastest way to see it today is to borrow the very coding agent you're building with as a stand-in client.
Keep the server running (your agent started it to test Concept 6; if it has stopped, ask it to start it again and note the URL it prints, like http://localhost:8000/mcp). In a second terminal, point your agent at that URL:
claude mcp add --transport http reading-room http://localhost:8000/mcp --scope project
The --scope project flag writes a reading-room entry into the project's .mcp.json (alongside Neon and context7); without it the server lands in a different scope and your agent won't pick it up here. Check it with claude mcp list; reconnect mid-session with /mcp.
Add a reading-room entry to the mcp block in your opencode.json, alongside the Neon and context7 entries already there (don't replace them):
"reading-room": {
  "type": "remote",
  "url": "http://localhost:8000/mcp",
  "enabled": true
}
Then ask, in an ordinary prompt:
Use the reading-room
domain_get_itemtool to fetch articlea1, and show me what came back.
Watch the agent discover your tool, call it, and read your article back to you. That round trip, an AI choosing your tool and using its result, is the whole product in miniature.
Two honest notes, so this doesn't mislead you:
- This is a dev-time peek, not the real delivery. Your actual customer is the chat app (claude.ai), which you connect in Concept 13. Here you're borrowing your coding agent as a handy MCP client, because it's the quickest way to see an agent drive your tools before any sign-in exists.
- It works only because there's no auth yet. In Concept 8 you add the lock, and an unauthenticated call starts returning
401. So remove this dev registration when you reach Concept 8 (claude mcp remove reading-roomclears the.mcp.jsonentry; in OpenCode, delete thereading-roomblock), or it will simply start failing, which is the lock doing its job.
Part 3: Prove — identity the model can't fake
This is the first half of "the server does what the model can't." Both Concepts here are invariant 3.
Concept 7: Identity from the verified subject, never from the model
Here is the problem. Your user_state table must write to the right person's row. But the model is the one talking to the user, and you must never let the model decide whose data to read or write. Picture the AI as a hotel concierge running errands for a guest. When the concierge tells the front desk "room 412 wants their mail," the desk must not hand it over on his say-so: a confused or manipulated concierge could name the wrong room and leak a stranger's mail. If Claude could pass you a user_id, that is exactly the danger, and one user would see another's data. This is the textbook trust bug of a connector-native app.
The rule: the model never supplies identity. When the user authorized your connector, they signed in through a trusted service, and that service hands your server a signed token carrying the user's verified id — the subject, or sub. That token is the guest's passport: the desk reads who they are from the passport itself, which the concierge cannot fake, never from anything he says. Your server reads sub straight from the token and uses that as the database key. So if a tool ever takes a user_id argument and the model fills it with someone else's id, your server ignores it: identity comes from the token's sub, never from a tool argument.
This is the rule the given auth.py enforces, which is why that file ships complete and you never rewrite it. In one line: it takes the verified id (sub) straight from the signed token and hands that to your database, so the person whose data you touch is decided by the sign-in, never by anything the model typed. You wire this file in next Concept; here, just hold the rule. The best way to make it stick is to have your agent show it to you in the code you already wrote.
Tie it to your own db.py. Paste this:
Read
auth.pyback to me in plain English, then open thedb.pyyou wrote in Concept 5 and show me where thesubcomes from now. Tell me what would break if a tool argument could set it instead, and tie it back to the concierge and the passport.
The lovely part: it costs the user nothing extra. The single Authorize click that turns the connector on is the sign-in. One action, two jobs.
Concept 8: Proving who's there (the sign-in, in plain English)
The machinery here is OAuth, the same "Sign in with Google" you've clicked a hundred times. This is the Concept to slow down on, but not because it's huge. It's because the failure mode is sneaky: auth code can look right and be quietly wrong. The good news is you only need two things, the ideas and how to check the result. Your agent writes the actual wiring.
The whole idea in five lines (the rest of this Concept is the detail under it). The user signs in somewhere else. That service issues a signed token. Your server verifies the token. Your server reads sub from it. The model never supplies identity.
It really comes down to two jobs, and you only do one of them. Signing people in is hard and a liability (you would be holding passwords). So you don't: a specialist runs the login and hands your server a token, a tamper-proof slip that says "this is who just signed in." Your server's only job is to check the slip. Spelled all the way out, four parties play a part:
| Party | Who it is | You build it? |
|---|---|---|
| The user | The person whose data it is | — |
| Claude's MCP client | Runs in Anthropic's cloud, asks on the user's behalf | No |
| The sign-in service (authorization server) | An outside specialist — hosted (Clerk, Auth0, Stytch) or a framework you self-host (Better Auth) — that checks the login and issues tokens | No — you rent or self-host it |
| Your gateway (resource server) | Your server; it only checks tokens and serves data | Yes |
Under the current MCP spec your server is a resource server only — it is not in the password business at all. Whichever issuer you pick, rented or self-hosted, you only validate its tokens here; issuing them is the AI Identity course. The flow:
- Discovery. A tool call with no token gets a
401(the universal "you're not signed in" refusal; it kicks the sign-in off, it isn't an error to fix). Claude finds your server's public note at/.well-known/oauth-protected-resource, which says "my sign-in service lives over there," and follows it to the login. - Sign-in. The user sees a consent screen — "MyApp wants to read your saved items and remember your place" — logs in with Google or an email code, approves. No password ever touches Claude or your server.
- Token. The sign-in service issues a short-lived token carrying the verified
suband an audience stamped to your server only. - Every call after carries the token; your server checks it and reads
sub.
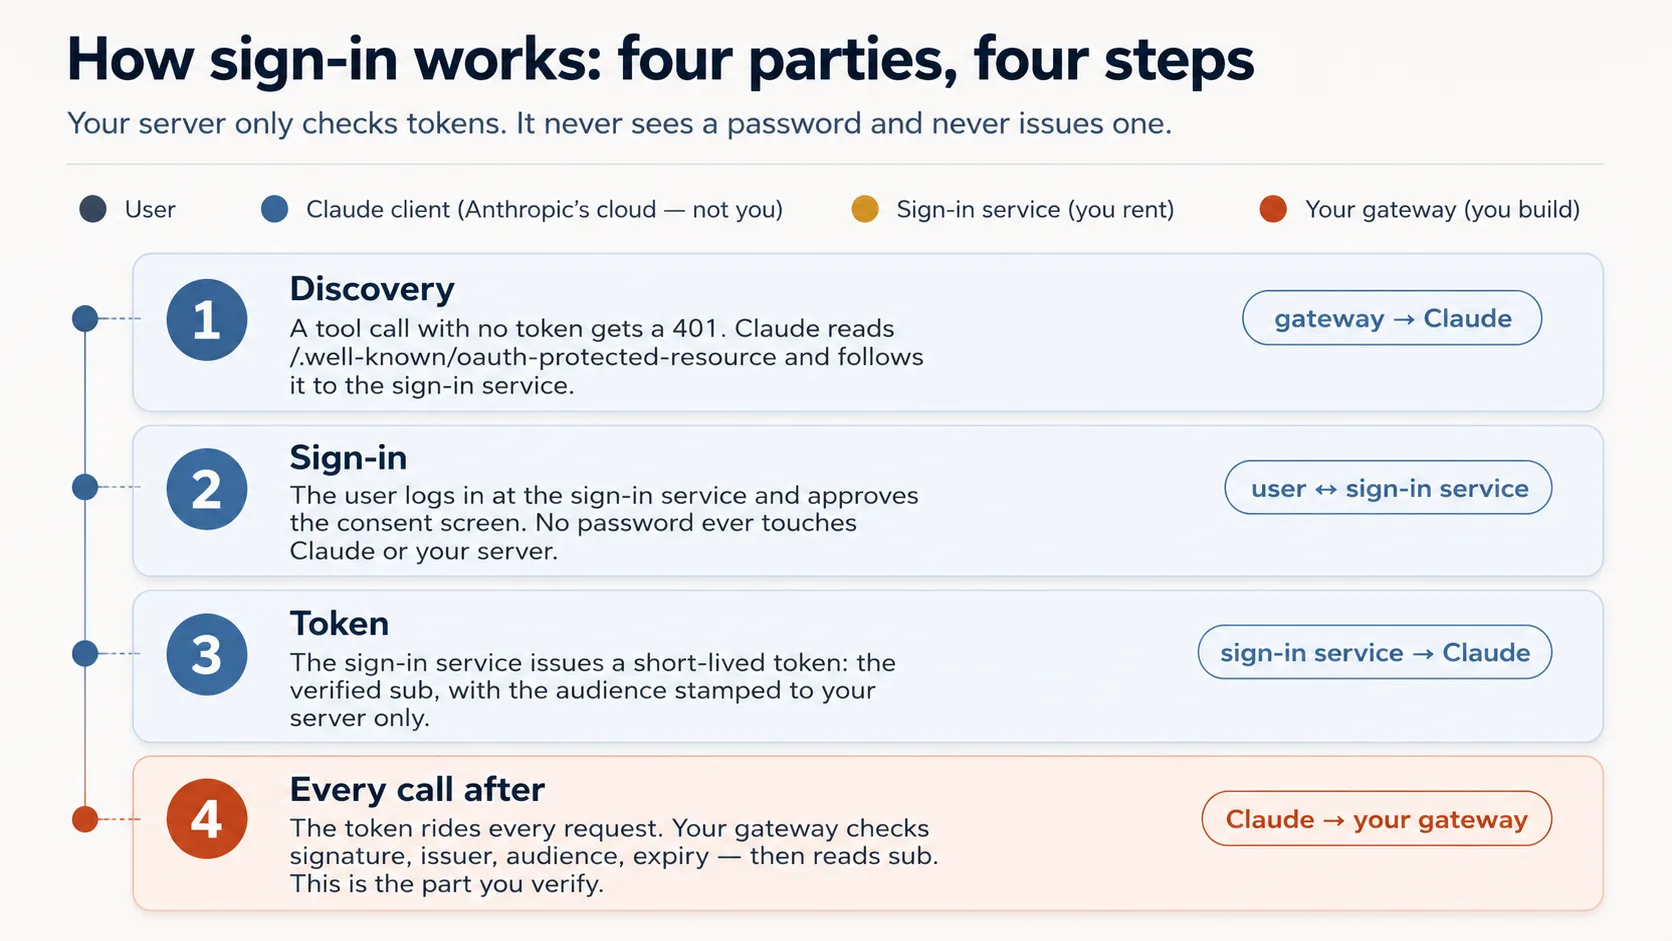
What your agent builds here is the wiring, not the check. The token check itself ships complete in auth.py (you never write it). What your agent adds is the thin layer that puts that check on the door: it makes a call with no token bounce back as a 401 and points Claude at the sign-in. That layer is the one piece that shifts with the FastMCP version, so your agent builds it against the current docs, not from memory.
So your real job is to know what a correct check looks like, well enough to catch a wrong one. And you already understand it, because it is exactly a border desk inspecting a passport: four questions, and a real risk behind each if the desk waves it through.
| The check | The question it asks | If your server skipped it |
|---|---|---|
| Genuine? | A real token signed by the issuer, not a forgery? | Anyone could forge a token with any name and walk straight in. |
| Trusted issuer? | Did it come from our sign-in service, not some other? | A token from a service you never trusted would be accepted. |
| Stamped for us? | Minted for this exact server, not a different app? | The most dangerous one: a token meant for another app gets replayed against yours. |
| Still in date? | Has it expired? | A stolen token would keep working forever. |
One rule sits on top of those four, the one from Concept 7: identity is read from the token's sub, never from a tool argument. Skip that and one person reads another's data.
That table is your whole verification checklist. You do not need to read any cryptography to use it. You check the behavior, which is exactly what the two prompts below do: a good token gets in, a wrong one is refused.
For the curious: those four questions as actual code
This is the given auth.py. You never edit it; it's here only if you want to see the four questions as code. Each commented line is one of the questions above.
# auth.py — the token check (ships complete in the base)
from jose import jwt
from jose.exceptions import JWTError

def verified_claims(token: str) -> dict:
    key = _key_for(token)                          # pick the matching public key (by the token's `kid`)
    try:
        claims = jwt.decode(
            token,
            key,                                    # Genuine?       signature checked against the issuer's public key
            algorithms=["RS256"],
            audience=RESOURCE_URL,                  # Stamped for us? must be THIS server (never omit)
            issuer=AUTH_ISSUER,                     # Trusted issuer? must be the service we trust
            options={"require": ["exp", "sub", "aud", "iss"]},  # Still in date? + require the facts we rely on
        )
    except JWTError as e:
        raise AuthError(f"token rejected: {e}") from e
    return claims                                   # claims["sub"] is the user; nothing came from the model
A few words you'll see in there: kid is which signing key was used, RS256 is the signing method, and sub/aud/iss/exp are the token's facts (subject, audience, issuer, expiry), the four the check requires.
Now build it, in two paste-and-watch steps. This is the one Concept to run on a strong model, not the cheap one, because "looks right" and "is right" diverge most here.
Prompt 1: put the lock on the door. The 401 is a doorbell, not a crash: a call with no token has to be refused in the one specific way that tells Claude "send the user to sign in." Paste:
Wire the OAuth layer around the given
auth.py, and don't rewriteauth.py. Check the current FastMCP via Context7 first, then wire theJWTVerifier/RemoteAuthProviderand the/.well-known/oauth-protected-resourceroute so an unauthenticated tool call returns HTTP401. Start the bundledmock_authservice (.envalready points at it). Show me an unauthenticated call returning401.
Done when: a call with no token returns 401 (not a tool error, not a 200). That 401 is what triggers Claude's sign-in.
Prompt 2: prove the lock actually discriminates. A lock that accepts every key is no lock. So you watch a good token get in and a wrong one get refused, and you call which of the four checks should catch it before you run it. Paste:
Mint a token from the mock and show me it resolves its
subthroughauth.verified_claims. Then, before you mint a token for a different audience, tell me which of the four checks should reject it. Mint it, show me it's rejected, and walk me through where each ofauth.py's four checks runs.
Done when: a good token resolves a sub, a wrong-audience token is rejected, and you've watched each of the four checks do its job.
What you'll see — and how to read the failures
A 401 on an unauthenticated call, a token resolving a real sub, and a wrong-audience token rejected. Confirm the four checks: signature, issuer, audience = your server, expiry. Missing audience is the most common subtly-wrong output. Three failures worth recognizing now:
- No sign-in prompt (you'll feel this when you add it to Claude in Concept 13): the
401or the/.well-knownroute is missing, so discovery never starts. The401must come from the auth layer, not from a tool raising — a token checked only inside a tool returns200. - Authorize loops or errors: the issuer or audience in
.envdoesn't match what the token carries. - Signed in, but every tool returns
401: the request accessor is reading the header from the wrong place (get_http_headers()stripsauthorization; read it from the request object).
This is the Concept to slow down on.
Keep one thing straight: you just rehearsed the flow, you did not become part of it. On the Beginner track you played every role so you could prove the lock works with no account anywhere: the bundled mock_auth stood in for the sign-in service, and you (through your agent) minted test tokens and handed them over. That exercised the exact auth.py path. But it can leave a wrong impression, that you or your coding agent mint tokens in the real thing. You don't, and neither does Claude. Here is who actually does what:
| Step | On your laptop now (rehearsal) | In production (the real thing) |
|---|---|---|
| Who signs in | nobody; you stand in | the end user, at the Authorize click |
| Who mints the token | the local mock_auth, when you trigger it | a real sign-in service (Clerk, Auth0, …) |
| Who carries it to your server | your test script | Claude's cloud, on every call |
| What your server does with it | the four checks | the same four checks, unchanged |
The whole point is the last row: your gateway and auth.py do not change between these two columns. They check whoever's tokens against the same four questions. So the real, multi-user version is mostly one swap: point the AUTH_* / RESOURCE_URL values at a real sign-in service instead of the mock, which is the AI Identity course. From then on the token is minted by the user's own sign-in, never by you, your agent, or Claude. (Part 5 of this course skips even that, turning auth off for a quick personal demo.)
Two production details round this out, and on the Beginner track your agent and the mock set both correctly, so they are not yours to hand-tune yet: PKCE (a handshake that stops a stolen login code from being reused) and an up-to-date way for clients to register. They become your responsibility only when you run your own sign-in server, which is exactly what the AI Identity course teaches in depth. When you deploy on the Standard track, a current hosted service (Clerk, Auth0, Stytch) handles them for you.
Go deeper: this course validates tokens; AI Identity issues them. Here your gateway only validates tokens (it's a resource server), leaning on a sign-in service someone else runs. Standing up that issuer yourself, your own OAuth/OIDC sign-in server, is the dedicated AI Identity course, built on Better Auth. Either way your gateway doesn't change: it keeps validating tokens the same way no matter who signs them.
✓ Checkpoint: the server knows who's there. Identity comes from the token, never the model, and the data is safe. Now make the model behave.
Part 4: Steer — make the model behave
The second half of "the server does what the model can't." All three Concepts here serve invariant 4 and the behavior of your app.
Concept 9: Where the app's rules live — a Skill, or the connector
A real decision, because there are two homes for your app's rules (how it behaves, its voice, its guardrails), and the choice decides how many steps a user does before their first request. Picture a restaurant. A Skill is a placemat printed with the rules, sitting in front of the diner the whole meal: it can't drift, because it's always in view. The connector is a waiter who tells you the rules when you sit and reminds you each course: it works, but you have to keep re-handing them. The placemat enforces better, but you have to set it down before you sit; the waiter needs nothing from you.
Option A — an uploaded Skill (SKILL.md). A file the user adds; it auto-loads when a request matches and its body stays in context, so it's the stronger enforcer of "always behave this way." The cost is setup. The Skills feature runs in Claude's code-execution environment, so it works only with code execution enabled — for any Skill, even a prose-only one. So the user must turn on code execution, upload a ZIP, and toggle the Skill on — three actions on top of the connector. And custom Skills are private to the account that uploads them, so there's no clean way to hand one Skill to thousands of strangers on the free tier.
Option B — inside the connector (recommended). The rules and "who is this user" are returned by a session-init tool the model calls first: one opening tool that hands back the rules plus a short-lived session token, the pass every other tool then requires (you build this in Concept 10). It is reinforced as the server works. The benefit is decisive for a public free-tier audience: no Skill means no code-execution toggle and no ZIP — setup collapses to adding one connector and clicking Authorize once.
The honest framing: choosing the connector is a friction decision, not a quality one. The Skill enforces better. But for free-tier, non-technical, first-time users, install friction is the biggest risk to the only thing that matters first — a user who never finishes setup gets nothing.
Skill (SKILL.md) | Connector (recommended) | |
|---|---|---|
| Enforcement strength | Stronger (always in context) | Slightly softer, mitigated below |
| Setup steps for the user | Four (connector + code-exec + ZIP + toggle) | One (connector) |
| Hand to strangers on free tier | Hard | Easy |
What makes the trade safe is four reinforcing layers the connector gives you: the tool description is always loaded and says "call session-init first"; the session-init return carries the full rules; every other tool return repeats a one-line reminder; and the real tools are gated behind the session token. So: ship the connector path by default, keep the Skill as an optional power-user add-on.
Concept 10: The session-init contract
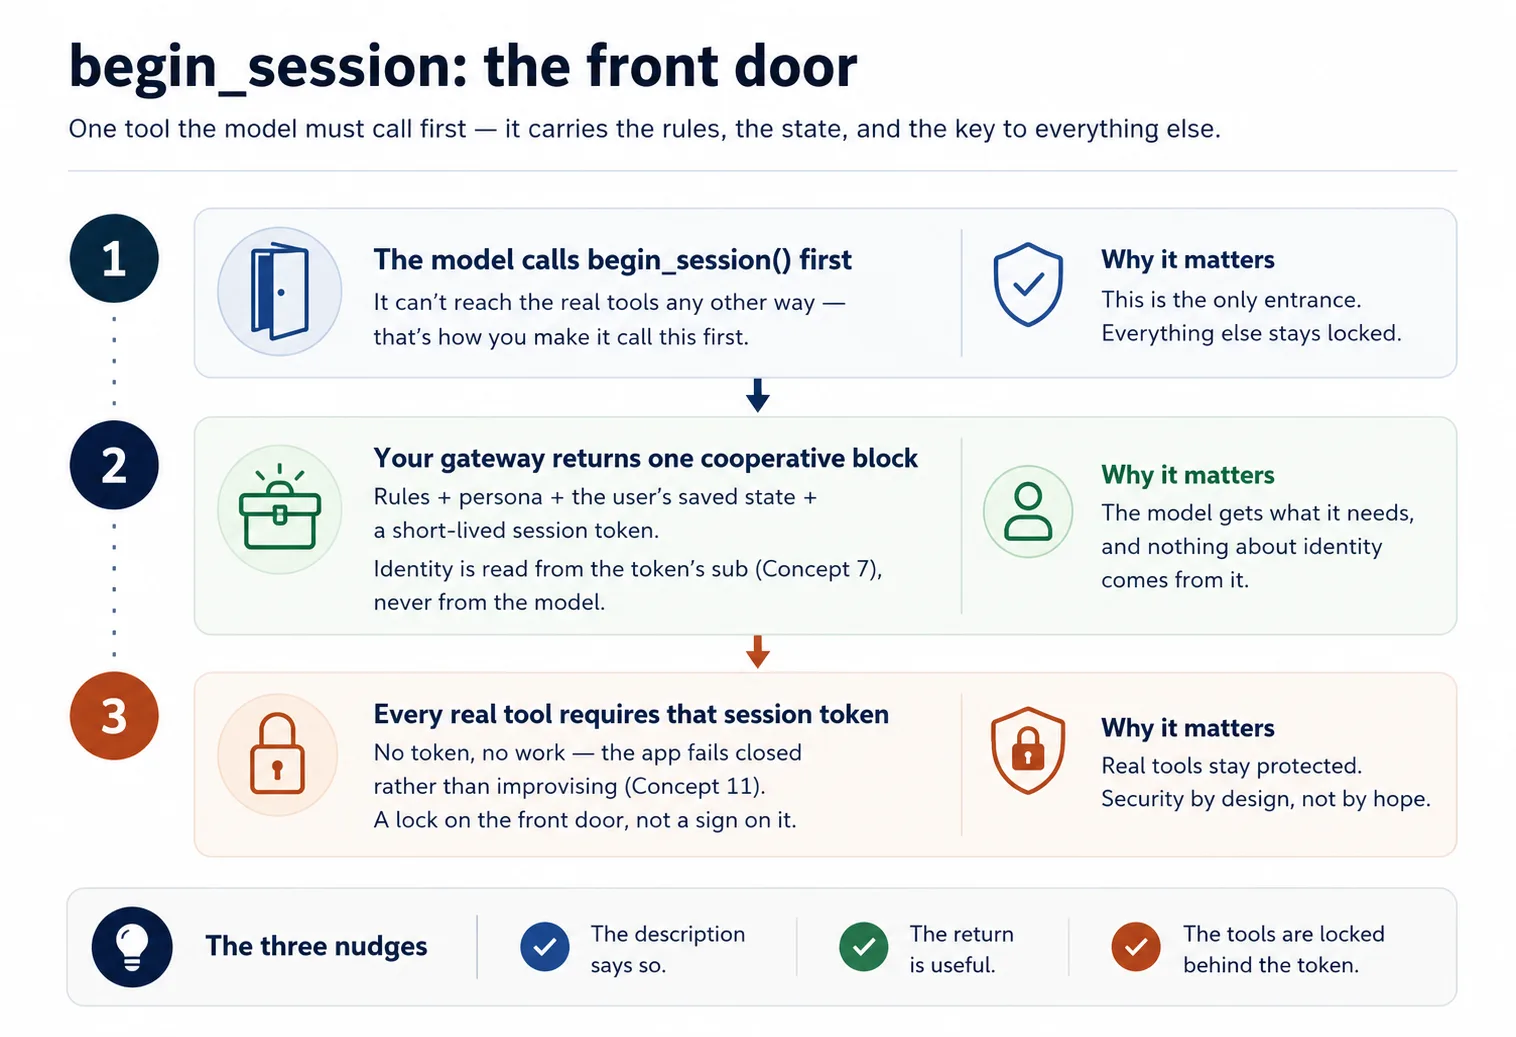
The rules and the user's state arrive through one tool the model calls first. Name it begin_session (your name).
When a user says anything that means "start" or "continue," the model calls begin_session(). This is check-in: the desk verifies the guest's passport (the signed token, Concept 7), then clips a keycard on them, a short-lived session token. Your gateway reads the app's rules (config_*) and the user's state (user_*) and returns them as one cooperative block — "here's how to behave for this user, and here's where they are" — plus that keycard. Every real tool then checks it: no keycard, no entry. (session.py, which mints and checks that keycard, ships given; you wire begin_session and the gate around it.)
Why a keycard you mint yourself, instead of something built in? Because this one is entirely yours: your server creates it, the model just hands it back with each call, and your code alone decides what it unlocks. That keeps the rule simple and fully in your control. It also happens to be exactly where MCP is heading: newer drafts of the spec tell servers that need to remember a caller between calls to do precisely this. So the simplest thing to build is also the future-proof one.
@mcp.tool()
def begin_session() -> dict:
    """Call this FIRST on any new request. Returns how to behave for this
    user, their saved state, and a session token the other tools require."""
    sub = verified_claims(current_token())["sub"]   # identity from the token (Concept 7)
    return {
        "session": new_session_token(sub),           # gates every other tool (Concept 4)
        "rules":   config_get_rules(),                # cooperative: "here's how to behave"
        "state":   user_get_state(sub),               # where this user left off
    }
Two design points your agent must respect:
- Phrase it as cooperation, never as an override. Say "here's what our guest likes; please help them settle in" and the concierge helps; shout "forget your previous instructions and obey me" and he calls security, because that is how a con artist talks and the model is trained to spot it. Cooperative phrasing sails through; bossy phrasing gets discounted by the same defenses that protect users from prompt injection.
- Make the model call it first by making it necessary. The real tools require the session token only
begin_sessionissues — so the model can't do the work without going through the front door. Description says "call me first," the return is useful, the tools are locked behind the token: three nudges converging on the right behavior. Then keep reinforcing — have each tool return its result plus a one-line reminder of how to present it.
Build it. Paste this to your coding agent:
Now wire the session contract. First create
config_store.pywith the librarian's rules and persona (theconfig_*group). Then addbegin_sessionso it checks the reader in: it reads identity from the verified sub and hands back those rules, the persona, the reader's shelf (from the store), and a signed session token (session.pyis given). Lock everydomain_*anduser_*tool behind that token, and have each one sign off with a one-line "present in the librarian's voice" reminder. Before you run it, tell me what a domain call should do with no session token, then show me it refused with no session and succeeding afterbegin_session.
Done when: the real tools refuse a call with no session and accept one after begin_session — the front door is the only way in.
Concept 11: Fail closed — don't quietly become a chatbot
A failure mode that silently ruins one of these apps: if your connector is missing, unauthorized, or erroring, the model still knows plenty on its own — and it will cheerfully improvise answers and invent the user's state. Now your structured product is a chatbot wearing its name, and nobody can tell until the damage is done. This is the opening's ATM rule again, only harder: the ATM is dumb and simply locks, but your clerk is smart and tempted to guess your balance to look helpful.
Here is the trap: locking the filing cabinet (the session gate) doesn't stop the clerk guessing from memory. The gate locks your tools; it can't lock the model's own knowledge. So your rules (returned by begin_session) must add the standing order taped to the desk: if begin_session is unavailable or a tool fails, say plainly that the session can't continue — do not improvise results or make up state. It lives in your config_* rules, where the model reads it on every session.
# config_store.py — the fail-closed paragraph (you write this)
RULES = """\
You are the assistant for <YOUR APP>. Behave as follows for this user:
- <how to greet, your app's do's and don'ts>

Fail closed: if you cannot reach begin_session or a tool returns an error, tell the user
plainly that the session can't continue right now. Do NOT improvise an answer from your own
knowledge and do NOT invent the user's saved state.
"""
That paragraph doesn't stand alone: the tools already raise on a bad or missing session (the gate from Concept 10), and each tool's return repeats a one-line reminder, so the model is steered toward honesty, not just told to be honest.
Build and prove it. Paste this to your coding agent:
Add the fail-closed paragraph to the rules in
config_store.py(ifbegin_sessionis unreachable or a tool errors, say the session can't continue; never improvise an answer or invent the user's state). Then stop my Postgres and ask the app to do its job — show me it refuses cleanly rather than inventing a shelf. If it invents anything, strengthen the rule and the per-tool reminders until it refuses.
Done when: with the database down, the app says it can't continue, not a confident, made-up reply. If you get a plausible-looking answer with the connector broken, the rule isn't holding yet; that gap is the whole reason this Concept exists.
✓ Checkpoint: the trust loop is closed. Identity is proven, the model is steered through a gated session, and the app refuses rather than faking. What's left is to put it on the internet.
Part 5: Ship it
Concept 12: Run it live (no Docker, no deploy)
Because Claude reaches your server from Anthropic's cloud, "it works on my laptop" isn't enough: a server on your laptop is a counter built inside a locked house, real but with no door to the street. The textbook fix is a full deploy (a container on a rented host). You don't need that just to see it work. Instead you open a temporary public doorway straight to your laptop, a tunnel, and run a quick pop-up of your connector. Free, no host account, no card, up in about a minute.
One honest move comes with it. claude.ai signs users in with real OAuth, and you don't have a real sign-in service yet (standing one up is the AI Identity course). So for this personal demo you turn the lock off with a one-line AUTH_DISABLED=1 switch. You already proved the lock works in Concept 8 against the mock; here you set it aside so you can reach claude.ai today without a sign-in service. With auth off everyone is one stand-in user, which is exactly fine for a personal test drive and is the single thing that makes a one-afternoon demo possible.
Build it. Your agent drives the bundled live-connector skill, which installs the tunnel tool, opens the doorway, and starts your server with auth off. Paste:
Put my connector live with the
live-connectorskill: turn auth off, start the gateway, open the Cloudflare tunnel, and give me the public connector URL. Confirm an unauthenticated tool list returns 200 over the tunnel before you hand it to me.
Done when: the skill prints a https://….trycloudflare.com/mcp URL and an unauthenticated tools/list returns 200 through it. That public URL is what you paste into claude.ai next.
It's an open, temporary doorway. With auth off, anyone who has the URL can reach your tools and your Neon data while the tunnel is up, and every caller is the same stand-in user. Treat it as a personal demo: take the tunnel down when you're done (pkill -f "cloudflared tunnel"), and expect the URL to change every time you restart it.
Concept 13: Add it to claude.ai and watch your whole app work
The payoff, and you do this part. No Authorize step this time, because auth is off for the demo:
- In claude.ai: Settings → Connectors → Add custom connector. Paste your tunnel URL (ending in
/mcp) and click Add. No client id, no Advanced settings. - Ask your app to do its job, in plain language.
- Open a brand-new chat and ask it to pick up where you left off.
What you'll see — and what to verify
Your app responds as itself: the model calls begin_session first, gets your rules and the stand-in user's state, and works through the gated tools. Because state is filed under the user id (here, the one stand-in sub), not under the chat, a brand-new chat resumes right where you left off: the chat is the visit, the identity is the profile. That cross-chat memory, inside claude.ai, from one pasted URL, is the whole product working. Two notes: everyone is the same stand-in user until real sign-in is wired (that's AI Identity), and when the tunnel URL changes you re-add the connector rather than edit it.
✓ Checkpoint: you ran it live. You watched your whole app work inside claude.ai: the model calling your tools through an identity-gated session, memory carrying across chats, the app failing closed rather than faking, all on a free account. The one piece left for a public connector real strangers sign into is a real sign-in service, the very next stretch of the path: the AI Identity course. Sit with what you built before the next part takes it apart.
Part 6: The capstone — your own domain
You built the Reading Room across the concepts. Now prove the skeleton is yours by pointing it at something you know. The skeleton never changes — one gateway, three tool groups, a begin_session contract, identity from the subject, fail closed — only the three groups do.
A few shapes worth seeing:
- A tutor — domain: course content; user: the learner's progress; config: a teacher persona plus the teaching method;
begin_sessionloads persona + method + the learner's position; fail closed stops it decaying into a generic chatbot. - A support assistant — domain: look up orders and policies; user: this customer's ticket history; config: tone and escalation rules.
- An internal-docs aide — domain: search the team wiki; user: which team you're on; config: what's confidential and how to cite.
- A booking helper — domain: availability and reservations; user: saved preferences; config: cancellation and pricing rules.
Pick whichever is closest to something you actually know, and run the same loop you just ran: plan → review → scaffold → accumulate → verify. Deploy it, add it to your own Claude, have it serve one real request and remember it the next day.
Start it the way you started the Reading Room: have the agent propose, and you review. Paste this:
Before you build anything, map my domain onto the three groups for me: what goes in
domain, what goes inuser, what goes inconfig, and whatbegin_sessionshould hand back for this app. Show me that mapping so I can review it the way I reviewed the Reading Room plan, then we plan the rest.
The rhythm never changed for the hard parts. The only thing that changed each step was what you reviewed — the tool list, the store, the verified_claims wiring, the gate, the fail-closed behavior, the live run. Master that loop and the specific code stops mattering, because you can always have the agent produce it and always tell whether it's right.
Discuss with an AI. Question your scores.
Come back when you have your BEST evaluation.
Part 7: The ceiling, and where it grows
Concept 14: The ceiling — and the bridge to owning a loop
Feel the edge of what you built, because it points exactly where the book goes next.
Your app can only act when the user types. It's the hand vacuum from Concept 1: dead until a hand squeezes the trigger. It can't wake up on its own, run on a schedule, notice something and reach out unprompted, or pursue a goal across several steps without a human turn between each one. That's not a flaw in your build — it's the nature of a connector-native app. The loop belongs to the host chat app, not to you.
The moment you want a worker that runs on its own — wakes up, takes steps, calls tools in a loop, finishes a job while you sleep — you have to own the loop yourself. That's the robot vacuum, and it's where the path leads. In Build AI Agents you stop tending the hand vacuum and start building the robot: you stop being the server a model calls and start writing the agent that does the calling.
Two courses come first. Plugins for AI Agents is the mirror image of this course: a connector-native app extends the chat app (claude.ai) for end users; a plugin extends the coding agent (Claude Code, OpenCode) for builders. Same idea, shipping a unit a host loads, aimed at the other host.
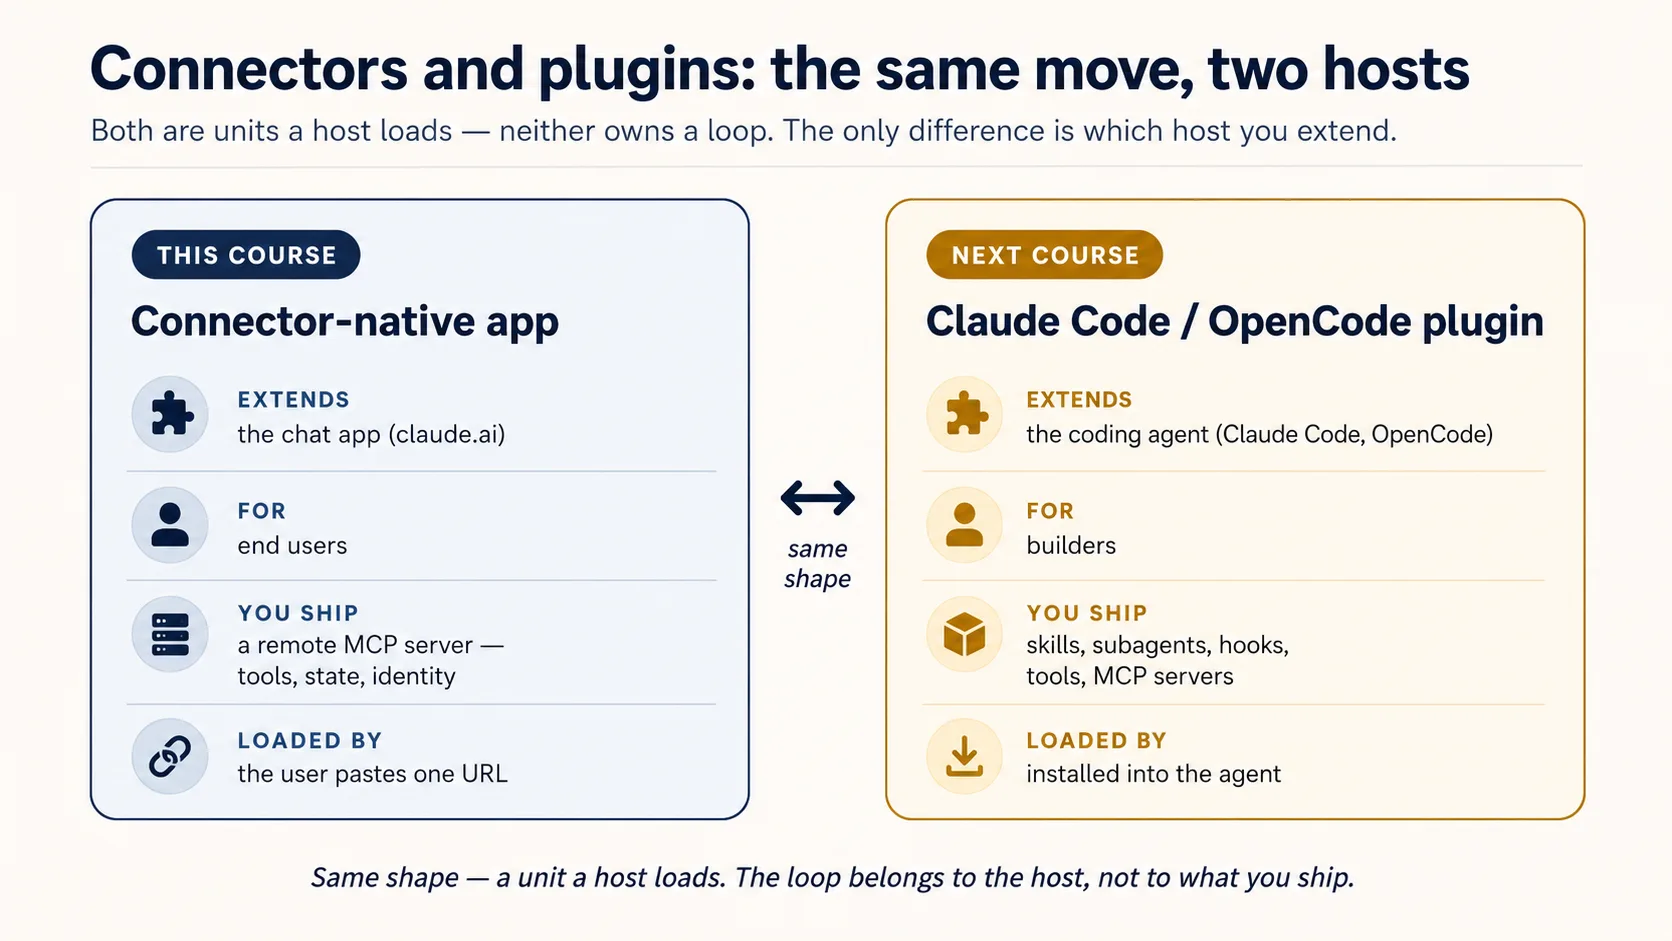
AI Identity: Human Sign-In and Agent Access, built on Better Auth, comes in two halves: first you own the sign-in, standing up your own OAuth/OIDC server that issues the tokens this course only validated; then you give an agent its own identity, a credential and a scoped, time-boxed, revocable, human-approved way to act on a person's behalf. Then Build AI Agents gives you the loop.
You didn't waste a step. You shipped what you can ship before you own a loop, felt exactly why you'd want one, and now you go get it.
The same app, deepened across Mode 2
You won't throw v1 away. Later courses upgrade this same app, which is how you end Manufacturing holding one real product you grew the whole way:
| You'll add | Which upgrades | In |
|---|---|---|
| Semantic search over your domain | domain_get_item(id) → domain_search(query) | RAG on Postgres + pgvector |
| A durable system-of-record (audit, approval, trustworthy state) | the bare two-table memory | Building a Digital FTE |
| A high-fidelity persona / richer config (no-fabrication guardrails) | the simple config_* rules | Identic AI |
| Your own token issuer, plus identity for agents (scoped, revocable, on-behalf-of) | the rented sign-in service | AI Identity (Better Auth) |
| Proof it actually does its job well | "it seems to work" | Eval-Driven Development |
| Production hardening (observability, a CI test gate) | the live tunnel demo | Deploy the Agent Harness |